VRRP (Virtual Router Redundancy Protocol)
Introduction
In this guide, we will quickly explain what the Virtual Router Redundancy Protocol is and give an example implementing it.
The Virtual Router Redundancy Protocol or VRRP is a network protocol that provides the automatic assignment of routers to participating hosts in order to improve availability and reliability.
The reliability of routing paths is improved through the use of an automatic default gateway selections.
A virtual router is assigned to act as the default gateway of participating hosts. Initially, a physical router called the MASTER will forward packets. If the MASTER fails at any point, a BACKUP router is selected to replace it based on priority.
This example implementation of VRRP will use the keepalived utility.
Enabling Virtual Router Redundancy Protocol
If the keepalived utility is not already installed:
Do not forget to use $ apt-get update to fetch the latest version of your package lists. Follow this with the command $ apt-get upgrade to first review the changes in the latest versions and then replace the old packages by installing the new ones.
To install the keepalived utility, run the following: $ apt-get install keepalived
Keepalived Configuration
keepalived has many configurable options that are all handled through a keepalived.conf file in /etc/keepalived/keepalived.conf. This file may not exist after installation. To use VRRP, create the keepalived.conf file and add the desired configuration.
Example Configuration in keepalived.conf file
vrrp_instance VI_1 {
    state BACKUP
    interface enp0s4
    virtual_router_id 150
    priority 100
    advert_int 1
    unicast_src_ip 192.168.1.11
    unicast_peer {
        192.168.1.12
    }
    authentication {
        auth_type PASS
        auth_pass 1212
    }
    virtual_ipaddress {
        192.168.1.13/24
    }
}
Detailed Descriptions:
| Configure | Description |
|---|---|
| vrrp_instance | Instance of VRRP. It is an identifier and should be consistent across nodes |
| state | Options include MASTER and BACKUP for defining the device’s desired state |
| interface | The network interface to run VRRP on |
| virtual_router_id | Can be anything but must match among VRRP instances |
| priority | Determines ordering of devices to be MASTER. Routers have a configurable priority between 1 and 254. The router with the highest priority becomes the master router. The default priority is 100. |
| advert_int | The interval of how often devices will advertise themselves to other nodes |
| unicast_src_ip | Multicast will be by default. Source IP should match current nodes IP |
| unicast_peer | Should include the IP address of all other nodes |
| authentication | Password is not necessary but is useful for authentication, and all matching nodes must have the same values. |
| virtual_ipaddress | The virtual IP address the host will use as the gateway. It should be unique and not already existsing. |
For a list of more information, visit Keepalived User Guide
Starting Keepalived
To enable keepalived, run the following command after installation:
$ sudo systemctl start keepalived
To check the status of the service run:
$ sudo systemctl status keepalived
Example Configuration
Consider the following topology:
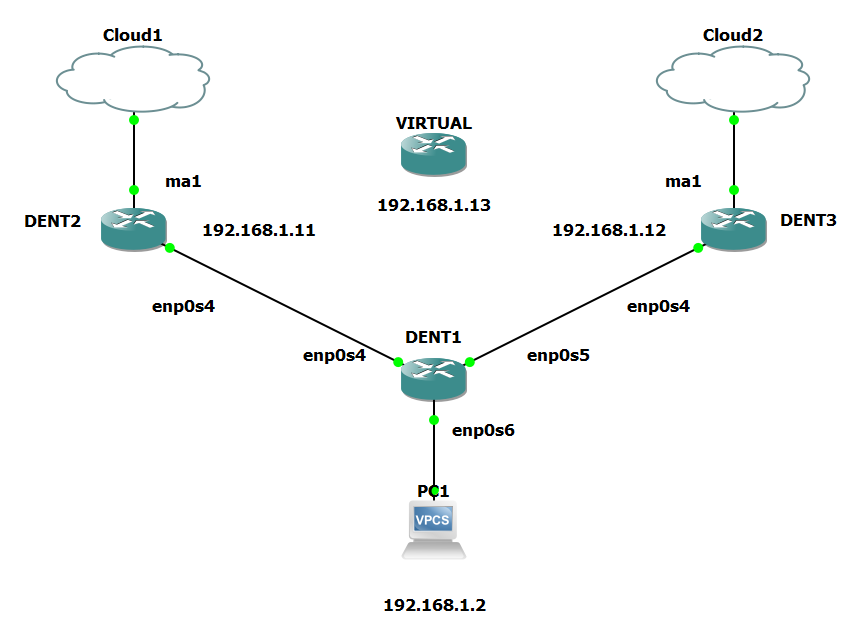
In this example, PC1 is connected to an L2 device (DENT1), which is connected to two L3 devices (DENT2 and DENT3). DENT2 will act as the MASTER, and PC1 will communicate with the internet through DENT2. We will simulate DENT2 going down, and using keepalived, PC1 we will re-establish a connection to the internet through DENT3.
Configure Devices
First, create a bridge on the DENT1 device to connect all interfaces. Use the following to do so…
DENT1:
$ ip link add name br0 type bridge

$ ip link set dev enp0s4 master br0

$ ip link set dev enp0s5 master br0

$ ip link set dev enp0s6 master br0
After the bridge is created, bring all interfaces up with the following:
$ ip link set dev enp0s4 up

$ ip link set dev enp0s5 up

$ ip link set dev enp0s6 up

$ ip link set dev br0 up
You may also attach an IP address to the L3 devices DENT1 and DENT2 with…
DENT2:
$ ip address add 192.168.1.11 dev enp0s4
DENT3:
$ ip address add 192.168.1.12 dev enp0s4
Bring these interfaces up with the following:
DENT2:
$ ip link set enp0s4 up

$ ip link set ma1 up
DENT3:
$ ip link set enp0s4 up

$ ip link set ma1 up
Configure keepalived
Next, ensure the keepalived utility is installed on DENT2 and DENT3.
If the keepalived utility is not already installed, run the following on both devices:
Do not forget to use $ apt-get update to fetch the latest version of your package lists. Follow this with the command $ apt-get upgrade to first review the changes in the latest versions and then replace the old packages by installing the new ones.
To install the keepalived utility, run the following: $ apt-get install keepalived
Once installed on DENT2 and DENT3, create a keepalived.conf file in /etc/keepalived/keepalived.conf.
In this example, DENT2 will act as the MASTER, and the following configuration will be used in the keepalived.conf file on DENT2.
This example will assign a Virtual Router with IP address 192.168.1.13 to DENT2:
vrrp_instance VI_1 {
    state MASTER
    interface enp0s4
    virtual_router_id 150
    priority 101
    advert_int 1
    unicast_src_ip 192.168.1.11
    unicast_peer {
        192.168.1.12
    }
    authentication {
        auth_type PASS
        auth_pass 1212
    }
    virtual_ipaddress {
        192.168.1.13/24
    }
}
On the DENT3 device, edit the keepalived.conf file and use the following example configuration to set this device as the BACKUP:
vrrp_instance VI_1 {
    state BACKUP
    interface enp0s4
    virtual_router_id 150
    priority 100
    advert_int 1
    unicast_src_ip 192.168.1.12
    unicast_peer {
        192.168.1.11
    }
    authentication {
        auth_type PASS
        auth_pass 1212
    }
    virtual_ipaddress {
        192.168.1.13/24
    }
}
Once configured, begin the keepalived services with:
$ sudo systemctl start keepalived
On PC1, specify the gateway address as the IP address for the Virtual Router.
PC1> ip 192.168.1.2 192.168.1.13
Enable Packet Forwarding
Additionally, ensure packet forwarding is enabled on DENT2 and DENT3 by running the following command on both devices:
$ sudo sh -c 'echo 1 > /proc/sys/net/ipv4/ip_forward'
Enable Network Address Translation
Since we are attempting to access the internet we must be aware that the private IP addresses with 192.168.1.x are only valid in our Local Area Network (LAN). To ping and get result back from the internet we must use a public IP address. This is why Network Address Translation (NAT) is used here.
Note, if you are only working within a LAN and not connecting to the internet, NAT is not required because the devices can communicate using their private IP addresses.
In this example ma1 acts as the external gateway for our LAN to connect to the internet.
To enable NAT on DENT2 and DENT3 use the following command:
$ iptables -t nat -A POSTROUTING -o ma1 -j MASQUERADE
This command appends a rule to the POSTROUTING chain of the nat table that enables masquerading. Masquerading is a form of network address translation that allows multiple devices on a private network to share a single public IP address for Internet access. When a packet exits the network interface ma1, this rule masks the source IP address with the IP address of ma1.
Keepalived
Once completed, PC1 should be able to access the internet successfully. If DENT2 goes down, DENT3 will take over.
The following ping is routing through DENT2:
PC1> ping 8.8.8.8

84 bytes from 8.8.8.8 icmp_seq=1 ttl=55 time=26.211 ms
84 bytes from 8.8.8.8 icmp_seq=2 ttl=55 time=18.960 ms
84 bytes from 8.8.8.8 icmp_seq=3 ttl=55 time=21.917 ms
84 bytes from 8.8.8.8 icmp_seq=4 ttl=55 time=26.588 ms
84 bytes from 8.8.8.8 icmp_seq=5 ttl=55 time=22.331 ms
We can see DENT3 pick up the virtual IP by watching the IP addresses of DENT3 on enp0s4 and bringing DENT2 down.
To watch the IP addresses of DENT3, use the following command:
$ watch -n 1 'ip addr | grep 192'
To take the virtual router on DENT2 down, use the following:
$ sudo systemctl stop keepalived
The shift from BACKUP to MASTER can be seen on DENT3.
BEFORE:
root@localhost://etc/keepalived# watch -n 1 'ip addr | grep 192'
Every 1.0s: ip addr | grep 192               localhost: Wed May  8 22:56:26 2024

    inet 192.168.1.12/32 scope global enp0s4
AFTER:
root@localhost://etc/keepalived# watch -n 1 'ip addr | grep 192'
Every 1.0s: ip addr | grep 192               localhost: Wed May  8 22:57:16 2024

    inet 192.168.1.12/32 scope global enp0s4
    inet 192.168.1.13/24 scope global enp0s4
While PC1 may lose connection once DENT2 goes down it will be able to reach the internet again through DENT3:
NOTE: It may take time for DENT3 to pick up the routing from DENT2. After some time, resend the ping to verify that the connection was re-established
PC1> ping 8.8.8.8 -c 100

84 bytes from 8.8.8.8 icmp_seq=1 ttl=55 time=21.525 ms
84 bytes from 8.8.8.8 icmp_seq=2 ttl=55 time=25.538 ms
84 bytes from 8.8.8.8 icmp_seq=3 ttl=55 time=68.537 ms
8.8.8.8 icmp_seq=4 timeout
...
8.8.8.8 icmp_seq=47 timeout
8.8.8.8 icmp_seq=48 timeout
8.8.8.8 icmp_seq=49 timeout
^C

PC1> ping 8.8.8.8 -c 100

84 bytes from 8.8.8.8 icmp_seq=1 ttl=55 time=21.525 ms
84 bytes from 8.8.8.8 icmp_seq=2 ttl=55 time=25.538 ms
84 bytes from 8.8.8.8 icmp_seq=3 ttl=55 time=68.537 ms
84 bytes from 8.8.8.8 icmp_seq=4 ttl=55 time=25.428 ms
NOTE: The above was tested on a virtual machine
Congratulations! PC1 is now routing through DENT3. Once keepalived is re-enabled on DENT2, it will again become the MASTER, and PC1 will route through DENT2. Note again it may take some time before connection is re-established through this route.